Now back to the garage (with a detour through the bathroom).
Our guest bathroom cabinet drawers and doors stink:
The hinges are loose, the doors are warped and don't shut flat, the drawers are crooked, and the knobs are all messed up. Ordinarily I'd just slice up some plywood, paint it, and call it a day but my wife said she'd let build some rail-and-stile door for our house if I practiced frame-and-panel construction on smaller stuff--so there you go.
I wanted nice stable wood for the project, but didn't want to spend much money on it. I think wood is like steak: you can spend a lot on it and not have to work very hard for good results or you can spend less, put some effort into it, and still get good results. I bought the metaphorical cube steak:

The above photo is from Chris Schwarz's blog. Chris has got to be the number one SYP advocate around, but even he concedes that you have to baby it.
I noticed something as I was walking around Home Depot the other day: a lot of the larger boards for sale are sectioned right through the pith (see three pictures up^^^). Now, I don't want the pith--nobody wants the pith--but on either side of the pith are prime pieces of wood, essentially quartersawn. I decided to just be selective and buy these underpriced boards and cut out the good stuff.
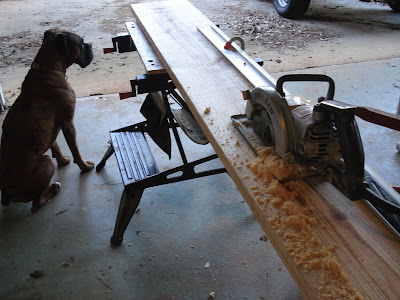
The boards were too big for me to safely handle by myself on the table saw so I busted out the old Skil 77: what a beast. Moses was, however, unimpressed: he being a bigger beast with a louder whine. You can see how wet the wood still is by how clumpy the sawdust is in the above photo. I suppose this is a good thing, as I don't really want all that stuff flying around everywhere.
Then I just ripped the nominal 2" boards in half and had some good-sized wood for the cabinetry:
You can tell how a board is going to warp by just thinking the rings want to be straight. So now you can understand how these radial cut minimize any cupping.
Half way finished:
Construction will be pretty straightforward: a four piece frame mortise-and-tenoned together with an interior groove capturing a raised panel. No funky stick-and-cope molding nonsense...just keep it simple.
This gave me the opportunity to try out a new toy:
This is a Record #043 plough plane I just got off eBay. It's pretty versatile and a real pleasure to use. It's also probably about 70 years old and still looks great. You gotta love nickel plating: if I somehow come into possession of another one maybe I'll make it into a hood ornament. It can make a 1/4" groove half an inch deep up to 4" from the edge of a workpiece. Here it's making a narrower groove that's shallower and closer to the edge...but hey, it's my first time with the thing. This is the groove that will contain the panel.
Here's how the mortise-and-tenon works:
I believe this is what is known as a haunched tenon. You can see how the tenon has a little nub that fills the groove to the right of the mortise. This is a good little trick that makes a stronger and cleaner joint.
Come together:
Right now:
Over me:
In the last picture I'm actually only gluing up half of it. One of the stiles (long pieces) can be popped off so I can slide the panel in when it's ready.
Speaking of the panels, it's time for those. My plan is to tongue-and-groove three boards together and then just be able to saw off sections to length as needed for the panels.
Tongue-and-groove, mortise-and-tenon, stick-and-cope, rail-and-stile, frame-and-panel...sheesh.
Anyone need any fire starter?
So that's where we stand now...waiting for some glue to dry. Tomorrow I'll make the raised-and-fielded (there's another one!) panel for this prototype door. Later.


Beautiful ideas here! Customize furniture and cabinets are really striking. I am thinking of how the kitchen cabinets design north shore ma will create their own designs that impacts the consumers.
ReplyDelete