I'm on a mission.
Rid the house of particleboard
My wife has a lot of books.
These books need homes.
Sagging particleboard shelves are unacceptable.
Off to the wood dealer I go.
This time I wanted to check out Peachtree Lumber up in Kennesaw. They had an enormous inventory of hardwoods including a "bargain bin." The bargain bin was actually a large area with lower grade hardwood to be had for a lower price. I walked out with I bunch of walnut for $2.54/bd ft. and "paint-grade" maple for $1.50/bd ft.
Have a look:


The walnut is beautiful, wild-grained wood; but that's part of why it's so cheap. That crazy-grained, flat-sawn wood fights you every step of the way when you are working it...particularly if you are a hand-tool guy. Power tools can usually blow through irregularities but hand tools have issues at times...we'll get to that.
The white maple was to be the shelves and the walnut was to be the casework. I decided to knock the shelves out first and build the case around them. This runs counter to a strategy that I'm trying to employ of building from the outside in. In this case I was material-limited so I had to plan very carefully around the limiting dimensions. I knew I had to have 5 shelves for this piece, so a defining dimension of the bookcase was however much I could get from the wood I had. Obviously the planks I bought were a little narrow for shelves, so that meant a long-grain butt joint...you know where this was going: tongue and groove.
Done...

...and done.

Note the tiger figuring on some of this wood:

Very nice, but a pain to work with. Essentially the grain does a little shimmy on each stripe and that makes getting a smooth surface difficult with handplanes.
But that was nothing compared to the walnut:

At least in the above specimen, the grain direction is decisive: first it's one way, then it's the other. On other pieces it was back and forth and back and forth. No fun: tear-out all over the place. But I got it smooth eventually by edge planing short sections in one direction and then hitting it from the other side.
So the stock prep got done...time for construction. It's a very simple design: the case will be dovetailed together, shelves fit into dados, and a nice face frame attached via loose tenon joinery. Simple stuff.
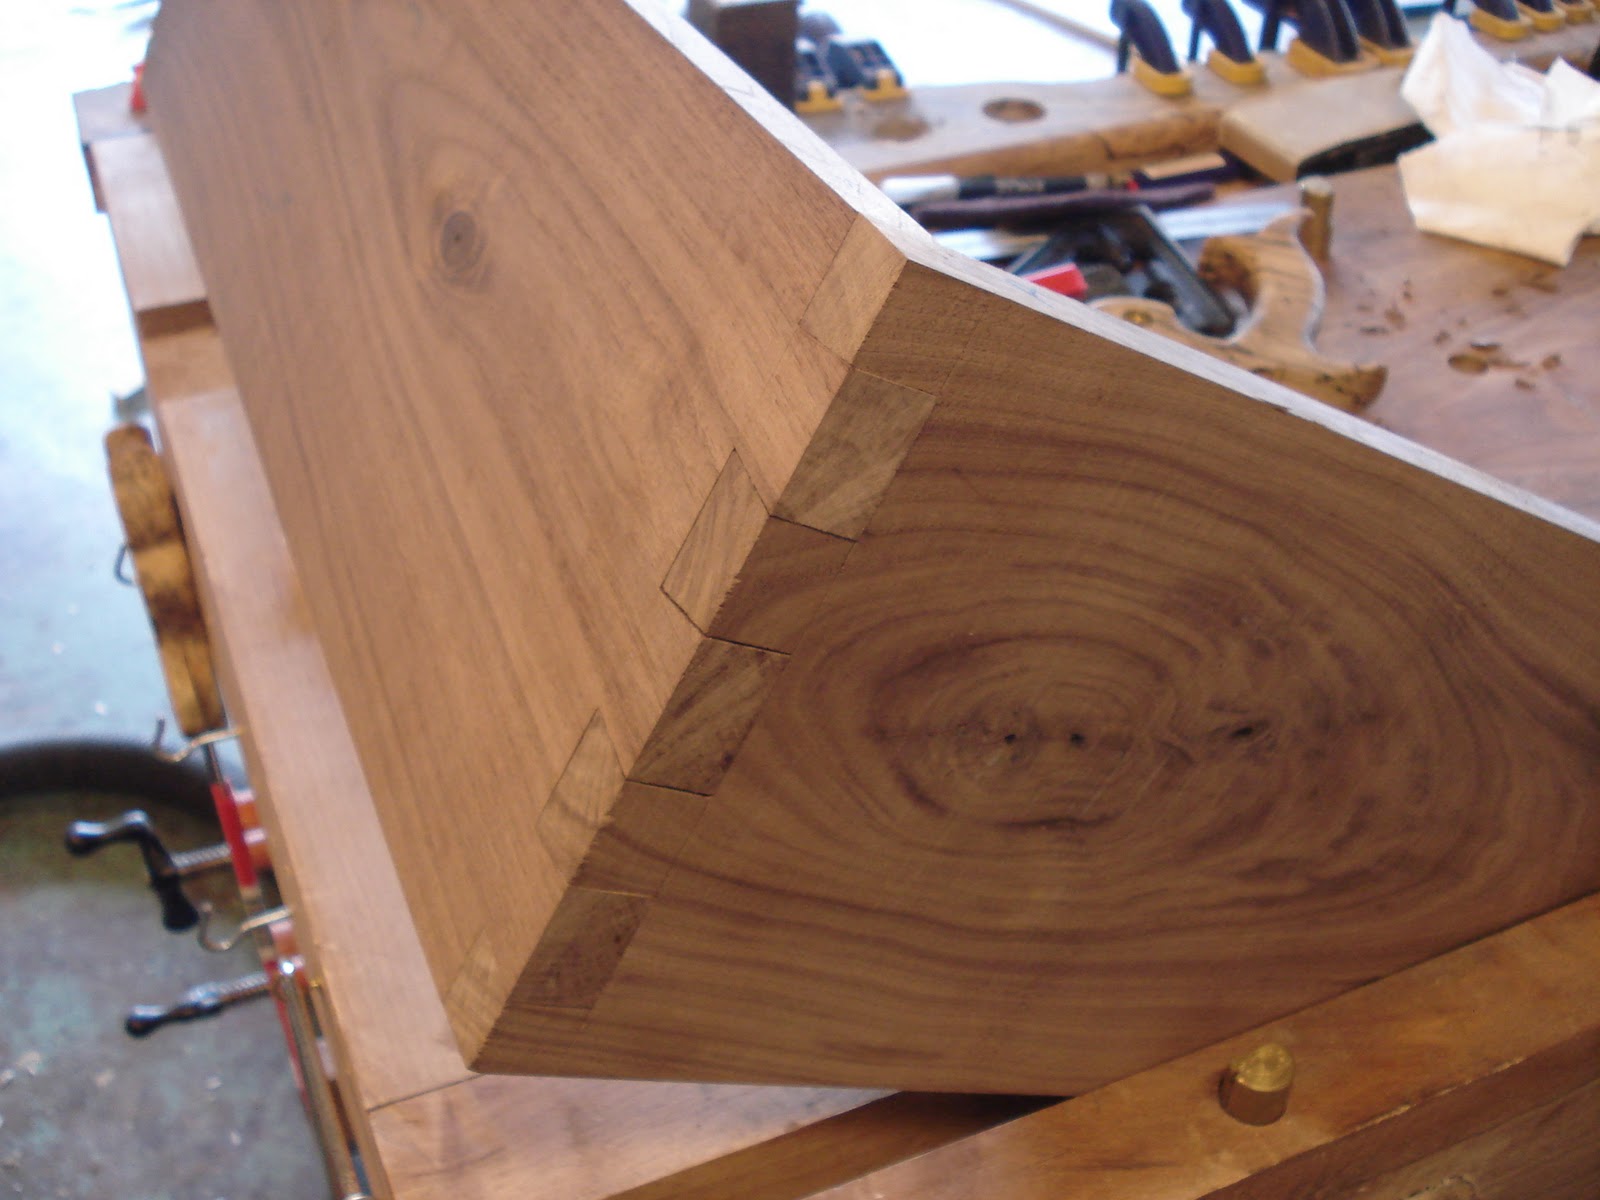
DTs:

The size of these pieces did present some problems to which I was unaccustomed. For example, pin layout had to be done sideways and without a vise...

...and pin cutting had to be done with me on top of the workbench:

But all's well that ends well.
Now time to fit the shelves. Here you can see the length of the shelf relative to the casework:

...not quite halfway overlapped: all good.

Here's how to rout dados for shelves: clamp the two side pieces together, clamp a straightedge normal to them, rout your dados:

I'm going to use this little space here to proclaim how much I love Bosch tools. They're such a pleasure to use. No funky styling either...just function...so nice.
My largest router bit is 3/4", the shelves are a little more.

Dangit
Not a big deal though. I could've power-planed all the shelves down to .748" but that would've been really loud; and since good music was on the radio at the time I took another course:

Oh, skew block plane, I do adore thee.
Fast forward to four shelves later: time to start thinking about the face frame. More long-grain butt joints. I decided to employ the old floating tongue technique that has gotten me into so much trouble in the past. What can I say? It's bound to work some day. Grooves plowed:

Uh-oh, that's no good:

Looks like a groove is exiting and will be visible. That's not really good form. Actually I anticipated this and considered busting out a mitered dovetail joint, but that's a joint that I need to practice a bit more before executing on a live piece. So I'll deal with it. It's not that big a deal:

...and done:

At this point the case was just three pieces of wood joined together with two joints: two sides and a top. I needed a brace on the bottom. My idea was to just attach a brace with exposed through dovetails flush with a bottom shelf. Here is one of the receiving tail sockets in the face frame:

Anyone see a potential problem? Yeah, because these sockets are oriented along the grain instead of in end grain, they are super delicate. Once everything is assembled it will be strong, but getting it there could be disastrous. And it was.
I tried a nice slow, steady assemblage with clamps slowly sliding the tails into place:

And it snapped that middle tail right off. Darn. So I screwed-and-glued it back in place.

All good:

Then I did the other side, this time with a preemptive screw in the middle tail.
That's no good.

That's even worse.


I used my dovetail layout guide to define the shape of the bookcase feet. This angle jives nicely with the nearby patched up dovetails. Notice how the right side of the guide is aligned with the edge of the wood: this is a trick I use all the time in layout. Doing this facilitates easily repeatable spacing around the rest of the piece.

Here's the exact same spacing repeated on the brace:

A little satin wax to bring out the depth of the grain...

Now we're getting somewhere!

I should do a commercial for Minwax:

Guilty. I do have a lot of books. Looking forward to my new bookcase!!!
ReplyDeleteBand names from one paragraph of this blog:
ReplyDeleteWhite Maple
Build the Case
This Runs Counter
From the Outside In
Material Limited
Limited Dimensions (or Limited Dementias)
Defining Dimensions (or Dementias)
Long-Grain Butt Joint
I also like "Be the Casework" and "Knock the Shelves Out First."
ReplyDelete