Saturday, April 23, 2011
Sunday, April 10, 2011
Bad Wood Good: Part II
When last I left, I had assembled a door frame and was letting the panel glue-up dry:

Next I trimmed it to the dimensions I needed. The idea behind frame-and-panel construction is that the panel "floats" within the frame, thus eliminating a major cause of warping and other sorts of distortion. That's not really a concern for this project because these are small little doors and they aren't actually going to be fitted within a rigid frame...but still I wanted to practice doing things right so I tried to cut them so they'd have maybe 1/16" of play in the vertical and horizontal axis.
Now for the fun part: fielding the panels. Growing up I remember wondering how the bevel was but on panels before electric routers were around. Here's how:
 Here's my trusty skew rabbet plane with the normal 90 degree fence replaced with an angled fence. This keeps the plane at a consistent angle producing a nice bevel. Notice how the edge of the panel that's being worked is aligned with the edge of the workbench; this provides additional support for the plane fence and helps keep everything aligned. Then it's just a matter of removing stock:

Here's the plane setup:

The process actually goes really quickly; I'd estimate that I can field one edge in about a minute. The one thing to look out for is the depth of cut. This plane doesn't have a depth stop on it, so I sort of have to go by eye.
After fielding one side, I raised the other. This is simply a matter of putting a shallow rabbet around the edges. For this I used another new toy: a Sweetheart-era Stanley 78.

I got it off eBay in immaculate condition...I was really pleased. Yes, the skew rabbet plane would've also worked for this, but that would've meant taking it all apart and losing all my setting on it. It's nice to be able to set the fence only one time per tool per project.
And that's that:
 The 78 has a depth stop too so it's pretty nice for raising panels where you have intersecting rabbets that need to come together at the same height.
Then I just slid the panel into the frame:

...and repeated the whole process:

So that's two down, three to go. The last three are going to be made assembly-line style with me doing each step for all three doors at the same time.
Then it's drawer time.
PS: Here's the bookcase in situ:


Next I trimmed it to the dimensions I needed. The idea behind frame-and-panel construction is that the panel "floats" within the frame, thus eliminating a major cause of warping and other sorts of distortion. That's not really a concern for this project because these are small little doors and they aren't actually going to be fitted within a rigid frame...but still I wanted to practice doing things right so I tried to cut them so they'd have maybe 1/16" of play in the vertical and horizontal axis.
Now for the fun part: fielding the panels. Growing up I remember wondering how the bevel was but on panels before electric routers were around. Here's how:


Here's the plane setup:

The process actually goes really quickly; I'd estimate that I can field one edge in about a minute. The one thing to look out for is the depth of cut. This plane doesn't have a depth stop on it, so I sort of have to go by eye.
After fielding one side, I raised the other. This is simply a matter of putting a shallow rabbet around the edges. For this I used another new toy: a Sweetheart-era Stanley 78.

I got it off eBay in immaculate condition...I was really pleased. Yes, the skew rabbet plane would've also worked for this, but that would've meant taking it all apart and losing all my setting on it. It's nice to be able to set the fence only one time per tool per project.
And that's that:

Then I just slid the panel into the frame:

...and repeated the whole process:

So that's two down, three to go. The last three are going to be made assembly-line style with me doing each step for all three doors at the same time.
Then it's drawer time.
PS: Here's the bookcase in situ:


Friday, April 8, 2011
Turning Bad Wood Good...and Then Into Cabinetry
"Sarah"'s comment from the "The Crappywood Challenge" has convinced me that reader interaction is a good thing and I'd like to encourage more of it. She went into one paragraph of the blog and pulled out all of the great band names from it. I thought it was hilarious; let's see more of that.
Now back to the garage (with a detour through the bathroom).
Our guest bathroom cabinet drawers and doors stink:

The hinges are loose, the doors are warped and don't shut flat, the drawers are crooked, and the knobs are all messed up. Ordinarily I'd just slice up some plywood, paint it, and call it a day but my wife said she'd let build some rail-and-stile door for our house if I practiced frame-and-panel construction on smaller stuff--so there you go.
I wanted nice stable wood for the project, but didn't want to spend much money on it. I think wood is like steak: you can spend a lot on it and not have to work very hard for good results or you can spend less, put some effort into it, and still get good results. I bought the metaphorical cube steak:


Yep, dimensional lumber from Home Depot--good ole' southern yellow pine. Lumber from Home Depot always come with a really high moisture content and therefore moves and warps a lot when you get it home.

Now back to the garage (with a detour through the bathroom).
Our guest bathroom cabinet drawers and doors stink:

The hinges are loose, the doors are warped and don't shut flat, the drawers are crooked, and the knobs are all messed up. Ordinarily I'd just slice up some plywood, paint it, and call it a day but my wife said she'd let build some rail-and-stile door for our house if I practiced frame-and-panel construction on smaller stuff--so there you go.
I wanted nice stable wood for the project, but didn't want to spend much money on it. I think wood is like steak: you can spend a lot on it and not have to work very hard for good results or you can spend less, put some effort into it, and still get good results. I bought the metaphorical cube steak:


The above photo is from Chris Schwarz's blog. Chris has got to be the number one SYP advocate around, but even he concedes that you have to baby it.
I noticed something as I was walking around Home Depot the other day: a lot of the larger boards for sale are sectioned right through the pith (see three pictures up^^^). Now, I don't want the pith--nobody wants the pith--but on either side of the pith are prime pieces of wood, essentially quartersawn. I decided to just be selective and buy these underpriced boards and cut out the good stuff.
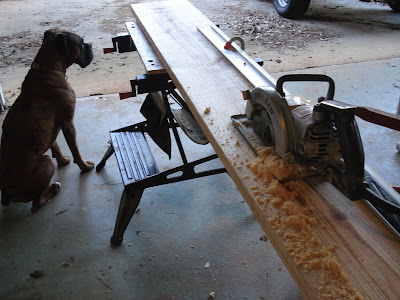


The boards were too big for me to safely handle by myself on the table saw so I busted out the old Skil 77: what a beast. Moses was, however, unimpressed: he being a bigger beast with a louder whine. You can see how wet the wood still is by how clumpy the sawdust is in the above photo. I suppose this is a good thing, as I don't really want all that stuff flying around everywhere.
Then I just ripped the nominal 2" boards in half and had some good-sized wood for the cabinetry:

You can tell how a board is going to warp by just thinking the rings want to be straight. So now you can understand how these radial cut minimize any cupping.
Half way finished:

Construction will be pretty straightforward: a four piece frame mortise-and-tenoned together with an interior groove capturing a raised panel. No funky stick-and-cope molding nonsense...just keep it simple.
This gave me the opportunity to try out a new toy:

This is a Record #043 plough plane I just got off eBay. It's pretty versatile and a real pleasure to use. It's also probably about 70 years old and still looks great. You gotta love nickel plating: if I somehow come into possession of another one maybe I'll make it into a hood ornament. It can make a 1/4" groove half an inch deep up to 4" from the edge of a workpiece. Here it's making a narrower groove that's shallower and closer to the edge...but hey, it's my first time with the thing. This is the groove that will contain the panel.
Here's how the mortise-and-tenon works:

I believe this is what is known as a haunched tenon. You can see how the tenon has a little nub that fills the groove to the right of the mortise. This is a good little trick that makes a stronger and cleaner joint.
Come together:

Right now:

Over me:

In the last picture I'm actually only gluing up half of it. One of the stiles (long pieces) can be popped off so I can slide the panel in when it's ready.
Speaking of the panels, it's time for those. My plan is to tongue-and-groove three boards together and then just be able to saw off sections to length as needed for the panels.
Tongue-and-groove, mortise-and-tenon, stick-and-cope, rail-and-stile, frame-and-panel...sheesh.
Anyone need any fire starter?

So that's where we stand now...waiting for some glue to dry. Tomorrow I'll make the raised-and-fielded (there's another one!) panel for this prototype door. Later.
Subscribe to:
Posts (Atom)