Monday, December 13, 2010

Number 12 gets a touch-up

What would you do the night before the last exam of your degree program? 

Restore a tool?

What a coincidence, me too.

I went back to my parents' house this past weekend for the first time in over a year. Between their house and their furniture they live among quite a lot of wood. I found myself unable to ignore the construction of most everything I came across during my stay there. They have accumulating a number of older objects from their own parents things, among them a tool chest that has been passed down from father to son along my father's line. This past visit wasn't the first time I had seen this chest or its content at my folks' home, but I guess I've learned quite a bit about old hand tools since my last examination. I knew what pretty much everything was. Take this beast, for example:
It was not too long ago that I would have had no idea what in the world this was, so I was quite proud of myself for knowing a scraper plane when I saw one. This is a Stanley #12 Scraper Plane. According to the Stanley Bible, this tool is no younger than 63 years old, but probably older. It is missing its handle and scraper blade, but the handle is easily made and the scraper is cheaply procured.

So I wrapped it in an old shirt and flew it back down to Tucker for a little TLC. I was shocked TSA didn't hassle me.

I made pretty good progress on the body tonight:


I got the vast majority of rust off it and polished the brass up a little bit too. I'm probably going to replace those nasty screws that hold the handle on--at least they weren't stripped Philips. We'll see the making of a new handle in the coming days. 

Until then, wish me luck tomorrow at 11:30.


Saturday, December 4, 2010

Procrastinating and Prototyping...

Let's see, in the next 10 days I have a presentation, a large modeling project* to finish--and start for that matter--an exam, and two finals. Sounds like today would be a great day to be productive, doesn't it?
*Subsurface contamination modeling...not swimsuit.

Yeah, it does. But I wasn't.

I decided instead to prototype a bow saw. Here's a fine example of one. It's typical on homemade versions to use a length of bandsaw blade for the blade. I happened to have an old one sitting around, so I was in business. Typically you drill a hole in either end of the blade and run a pin through it to attach it to the frame. The only problem is that these holes have to be at fairly precise lengths to make it work. I don't have much faith in my precision, so I thought of a work-around. The brace of my saw would meet the two arms at pivoting mortise and tenons that would allow for a large margin of error in overall blade length. If you don't understand, keep going; a picture is worth 1000 words.

I had a nice scrap of maple lying around. Looks like a potential saw, doesn't it? Lilah thought so too.

Then I cut it down...
As you can see, it's really starting to look like an actual tool by now.

Then I just eyeballed a shape for the arms and bandsawed them.

Then I chopped my mortises into the arms where they join the brace. Next I needed to cut the inside curve along the mortise shoulders. Here's how I got uniform curves:
An arm is in the background and a piece of scrap wood is in the foreground. I centered the scrap wood to the center of where the mortise was and swung an arc with a compass. Then I cut the arc out with a coping saw:

Next it was time to cut the tenons for the brace. I'm not aware a tool that would work really well for cutting a curved shoulder, so I just roughed it out and then trimmed away:
I suppose a compass-shoulder plane would be ideal for this job...the problem is that I don't think they exist. This theoretical tool would be a combination of this and this.

Anyway, once the brace was finished I had a rough bow saw:
So you can see now how the arms can pivot to accommodate slightly different length blades. Anyone see a problem with this design? At this point I didn't either.

Now it was time for the hardware. I bought some 8mm bolts and ground flat sides opposite each other on the ends:

Next I needed to cut a slot for the blade to run between the two flat sides. Trying to start a hacksaw cut on the end of a bolt can be quite a trial so I helped myself out by using a sharpening file to start the groove:

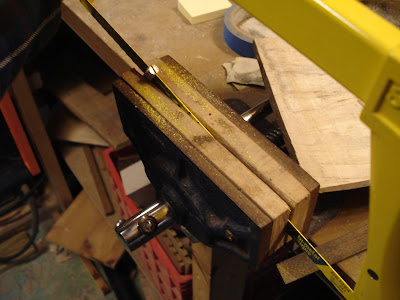
Then I just used a hacksaw to cut the slot. Notice how the vise is used as a guide for the cut:

Then I drilled one side of the slot bigger than my pin bolt and the other side slightly smaller so that the bolt could tap it itself:


Now time to put it all together:
What happens is that by turning that stick in the middle, the string at the top of the arms tightens. This causes the arms to pivot on the brace and this is what tensions the saw blade. Believe it or not, this actually worked. There was, however, one detail that prevented the saw from cutting really will. If you examine the picture closely you can see that bent nails are pinning the blade in place, not the pin bolts. The saw blade was, in this case, too narrow to drill a hole large enough for the pins to fit through. The nails worked alright, but they allowed a lot of slop that prevented the blade from remaining aligned. This caused the saw cut to wander. No good. Ideally the bolt would tighten the blade in place and kept it aligned. I'll need a new bandsaw blade.

I also have to say that the pivoting mortise and tenon doesn't work great. Sometimes the whole frame "racks," like a big parallelgram. It's a little hard to explain in words. Oh well, it was a good effort.

My wife also did some woodworking today:
She broke her first board in taekwondo...the woman is truly lethal.

Maybe tomorrow I'll start that modeling project...

Wednesday, December 1, 2010

Progress Report

I'm sure that all of you faithful followers have been checking this blog every day for the past few weeks and have had your hearts broken daily by the lack of new material. What can I say? I've been busy.

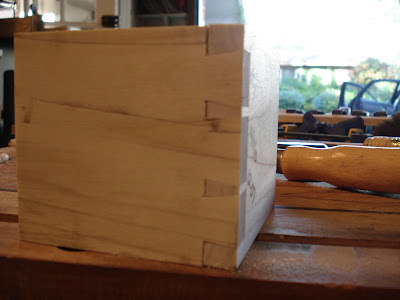
Not really...just haven't been working much wood. I milled a couple more logs for stock and have been pretty good about keeping up with the dovetail-a-day project. It's not going to exactly be "30 DTs in 30 days" because I was away for Thanksgiving, but it will be close. Here's where things currently stand:

Pretty cool, eh? I was considering making it an outwardly spiraling square, but then you couldn't see old joints and that would've taken a lot more wood towards the end. Here was the first effort:

And here was tonight's specimen:
It hard to capture the differences with a camera, but you can see a lot less over-cut at the base of the tails and pins. There is a little blow-out on that top full-pin but I think that actually happened when I cut the stock to size. I've also reduced the time by nearly a third, so that's pretty good.

The past two days have been very wet here in North Georgia. Rain, rain, and more rain. I was out in the garage yesterday puttering around and noticed a light coating of RUST on the side of one of my bench planes. Then I noticed it on the sole of the plane. Then I saw some on other planes, some on my holdfast, some on my vise hardware, and basically the whole surface of my scrollsaw. Most of it was light enough that I could just rub it off with a rag damp with Boeshield. Other surfaces, such as the scrollsaw were in bad shape:
For this, I had to get out the sandpaper and give it a little elbow grease. In truth it's pretty satisfying work because the results are pretty quick and look nice too:

This rust had to have formed in about 48 hours. Unreal. A couple of weeks ago I started keeping a Boeshield rag in a little Altoids tin on the workbench for wiping off my handsaw after I used it. The Schwarz recommends this and I'm now inclined to extend the use to all ferrous tools. Along with more Boeshield, I've added a respirator to my Amazon wishlist; I'm getting a little tired of that penny taste in my mouth.

Speaking of Amazon, it can be pretty fun to play around with some times. For example, THIS is the most popular item in the "Tools and Home Improvement" category. I watched the video for Twilight Turtle wanting to know if he projected actual constellations and it looks like he does. But judging from the included book they're all messed up: they have Cepheus as a house! Grrr. Also, THIS is the bestseller in the "Power and Hand Tools subcategory. Is that even a tool? Frankly I'm astonished THIS and THIS weren't even in the Top 10. Come on, America! Is there any question that our country is in the tank?

So there you have it...not a whole lot to report. Right now I'm just trying to wrap up the semester, graduate, and get really really good at dovetailing. Also, most projects in the near future will probably be Christmas gifts, so they may not receive the much attention on this blog.

In the near future I'm looking at building another couple of saws. I've been looking at bow saws for a little while and I think they would be fun to make, so look for that after Christmas. My mind is moving more and more towards harvest lumber for stock, so I think a big rip frame saw is in order as well.

Thursday, November 11, 2010

Beginning a Journey of Homeric Proportions (1:6)

Perhaps my favorite woodworking blog is Chris Schwarz's over at Popular Woodworking. How he produces the discharge of substantive output is beyond me.  Then again, it is his job.

John Economaki recently pointed out that Chris has the exact voice of Tom Brokaw. Click the hyperlinks to see for yourself. Watching his videos are never the same anymore. I also see that Mr. Schwarz is coming to Alpharetta in March to teach some classes. That might be fun.

Anyhow, yesterday's blog entry was titled "A Dovetail a Day-Hurray." Not the cleverest title, I know. Apparently he had written a little article in Popular Woodworking a couple of months ago about getting really good at dovetailing by knocking out one every day for a month. His blog links to the article which I think raises a really good point. I'll quote:

"So many times we learn woodworking on the fly as we build something. We get our skills just good enough to accomplish that project and then we move on. It's rare to get out a board and just saw it. Or plane it. Or mortise it with our router."

True, true. A reader took him up on this and the results are pretty good. By limiting yourself to only one at a time you have time to scrutinize your previous mistakes and try to do better the next time.

So that's my plan: 30 joints. I have some poplar ("the other softwood") floating around that I think will be pretty good for it. Poplar is pretty soft and can be unforgiving to the heavy-handed. I'm also going to add speed to the mix too. My goal--inspired by Konrad Sauer--is to be very efficient while increasing accuracy.

Here are the rules:
-the stock will be prepped and ready to go
-tools will be laid out and ready to go
-no pre-layout is allowed
-all marking and measuring gauges must be zeroed out...no presetting
-Start=touch tools
-Finish=plane the pieces flush and put down the plane

Cell phone kept time.

Every joint will have 3 tails, 2 pins and 2 half-pins. Here are the results of day one:


Some observations:

-I think I should throw away my dovetail angle guides. The slope of my tails here were defined by eye and cut freehand. I think that they are pretty darn consistent. 

-It would be worth the time to be a little more mindful of my depth of cut. I'm shooting through my scribe line just about every time. Usually I'm not too bad with this but I neglected it here because of the clock...not smart.

-The jointer plane was used to finish out the joint. There was no need for that big thing...next time I'm using the smoother.

As the picture says, I finished this one in 12 minutes and 7 seconds. That's not really too bad but the quality needs to come way up. Joinery maestro Rob Cosman (another Canadian, by the way) has it down to under 4 minutes and Frank Klausz has it closer to 3.

Sunday, November 7, 2010

Miller Time!

It has finally started to get cold here in Atlanta and at our house that means it's time for fires. At one point I had a firewood collection that I thought would last us through 2013 at least. That does not appear to be the case. At this point I'm not sure it will last us through this winter. With this weighing on my mind I went out to split some wood yesterday. I'm a bit of a neighborhood scavenger: whenever I'm out walking the dogs and see that someone has felled a hardwood and left the logs for the county to pick up I'm instantly on them.

This summer some yellow jackets took up residence in my splitting area which prevented me from getting at a couple of nice truck pieces during the warm seasons--I'm rather allergic to stings. Besides who wants to split wood when it's hot out? The yellow jackets have now left (or are hibernating, or have died...whatever they do during the winter) so the splitting can commence.

This trunk log had been sitting on the ground for at least 6 months, so I wasn't surprised that there was some spalting. What did surprise me was how much there was. Hmmm, warm the house or have some interesting wood to work? There will always be firewood out there...I decided to slice it up. 

Here's what I started with:
It's big and chucky and won't really fit on my bandsaw.

By slicing off some of the more extreme areas I can make it fit into the mouth of the saw.. Take care in doing this, it's a good way to break a blade.

If you are going to all of the trouble to mill your own wood, you might as well quarter-saw it, right? My first cut on the sled is a cut parallel to the tangent of the arc of the outside of the tree (arc of the bark, if you will). This will serve as the base of the log and all cuts afterwards will be normal to this. Here's the resulting first cut:

Pretty dramatic, isn't it? The picture is a little misleading because it looks like this cut is radiating out from the middle of the tree. It isn't...that log just split funny. My sled is a copy of Matthias Wandel's...I wish I had a bandsaw as big as his.

Then I planed the surface with my jointer to flatten it:

Next I put the log flat face down on the sled and ran it through again:

Now I had two faces normal to each other. At this point I just set the fence on the bandsaw and sliced away:

Of note: this was a funky piece of wood with wavy grain:

Wood like this is much easier to plane when it is still moist.

Now I'll just let it sit in the shop for a while and dry out. I'm not sure what to do with it just yet but it never hurts to have some decorative wood on hand. I wonder how much Carlton's pays for stuff like this.

Monday, October 25, 2010

An Upgrade, a Fix, a Rant, and a PSA

In my very first post of substance--if any could be called that--I talked about making some drawers out of reclaimed firewood. I then put those drawers aside and went to town on the workbench. The other day I made a simple three-sided frame for them, screwed and glued some slides into place and mounted it underneath the bench.

 I think the pulls complement the rustic look of the wood.
So now I have a convenient place where I can keep my hand tools close by.

I've mentioned before how I've been a little disappointed with the face vise. There has always been a little too much play in the guide rails to keep it nice and rigid when exerting force. I measured the diameter of the guide rail and they came out at a little bit under 1/2" wide. I had some 1/2" copper pipe left over from another project so I decided to make some bushings.
The bushings significantly reduce the amount of play in the guide rails, although not quite as much as I had hoped. I had hoped that their inner diameter would actually be a little small so that I would have to press-fit them onto the rails. They weren't, but that's alright; things are much better now.

I really like Irwin Quick Grip bar clamps. They are quick, easy, and typically suit my needs very well. I broke one recently--which ordinarily wouldn't be much of an endorsement--but I have to say that it broke because it was so strong.  I forgot it was holding two pieces together when I was lifting a heavy object and the object actually started pivoting on the clamp. The clamp did not let go of the piece, instead the jaw sheared right off.

So that's what got me looking at new ones down at Home Depot the other day. Now, as much as I love the clamps, Irwin's pricing strategy is an absolute mystery to me. Here's my collection representing much of their product line:
The Irwins are the blue ones. From left to right: 2x standard 6" clamps, 5x mini 6" clamps, 2x mini 12" clamps, 6x hand clamps, 2x spring clamps, and then 2x micro clamps.

So the hand clamps and the spring clamps are reasonably priced, but explain this to me: one of the tiny micro clamps costs more than one of the 6" mini clamps. A pair of 6" mini clamps costs $18 while a pair of 12" mini clamps cost $30, despite the only difference being a small amount more bar stock. These are weird peculiarities, but once you look at combo deals things get ridiculous. Example: you can get a 6" mini clamp for $13 or get four of them for $20. As I said, you can get a pair of 12" mini clamps for $30 or for $25 you can get that same pair plus a pair of 6" mini clamps plus a pair of hand clamps plus a pair of spring clamps. I think that combo deal is a Home Depot exclusive from Irwin, but it's not a temporary sale price...it's always available. I'm not complaining here--I bought that crazy combo afterall--but it just makes no sense to me.

And finally a Public Service Announcement: anyone who has worked a project with me knows how much I detest Phillips head screws. They are a tidal wave of profanity waiting to happen. People don't realize that they are actually designed to slip (or "cam out" as it's known) and once they slip, you know they're going to strip.

Phillips screws were designed back when a lot of manufacturing was becoming automated and manufacturers needed screws that would tighten to a specific torque but no more. That's when Phillips came in: the big assembly line machines could easily tighten lots of screws and cam out at a specific torque instead of overtightening. These days these machines have torque sensors or preset clutches that accomplish this...and yet the Phillips head is the design we Americans see the most. I'm told that Germans generally use torx/star fasteners--I can verify that my wife's VW does--and that Canadians generally use Robertson drive (square). I'm a big fan of both of these and try to spread the good word as much as possible. They really both have two advantages: you can apply lots of torque without fear of stripping them, and the screw stays on the driver much better so you don't need two hands to install them.

This is probably old news to many out there, but what I really wanted to share is something that I don't think many people realize: a lot of Phillips head screws out there are made to accommodate Robertson drive as well and enjoy the same benefits:

Most folks would probably attack this screw with a Phillips driver. However, look closely at the pattern and notice how it's also meant to accept a #2 Robertson as well. The corners of the cross are lopped off and square driver fits perfectly in there.
Yep, stays on there really well...even with this sizable screw. No, I'm not using a magnetized bit. Pretty sweet. I would also bet that with this configuration you could screw/unscrew 10 times the number of times without stripping it. I've even been able to use Robertson bits on screws that were totally stripped 100% Phillips screws. The square bit just works better.

So do yourself a favor, buy good screws. I like Spax and Kreg.

Sunday, October 17, 2010

Look! It's a Bird...It's a Plane...Yep, it's a Plane

Will plane jokes ever get old?

The one essential hand tool that I don't have is a shoulder plane. These are precision planes meant for trimming up corners where two faces meet. The iron (blade) extends all the way over and sits flush with both sides of the tool. They are a must have for executing consistently good joinery and up until now I've just been making do.

There are a number of options out there for these guys: you can buy a nice Lie-NielsenVeritas, or Clifton brand new and spend $200-$300. Used ones on eBay don't go for much less. You can also generally find one or two Records on eBay at anytime but a good one will still be around $150. There are also tons of antique wooden ones on eBay, but you never know what you are really going to get there and they'll still run you around $60. Of course one can always go for a nice Sauer & Steiner too, but the price can be a little discouraging to say the least.

I also saw that you can buy a kit--such as the one from Hock--and build your own. Still flying high from the saw kit success, this was a pretty exciting option for me. Still, the kit was $100. That's some real money.

In the Western tradition, the plane is sort of viewed as the Swiss watch of tools: something extremely complex with many subtleties...something to be attempted only by people who really know what they are doing. In the Japanese tradition the plane is just a jig that holds a blade; the blade is where the craftsmanship comes in.

So, to counterbalance my move to Western saws, I'm adopting the Japanese mindset of planes--well, kind of: mine is still a push plane of the Western variety--but I'm not going to get bogged down by all the mysticism of it:

"...just eyeball it and hold your breath..."

So first I need wood and an iron:
Check. I bought a Clifton 410 iron from Highland yesterday with my 25% off coupon. It was still around $23 but that's not too painful. I also still have that mun ebony from the inlay project; I guess I'll be getting a little less money back now if I return it.

Pick an angle:
Uhh, sure: that looks good. Seriously, that was my method.

I then took the wood to the bandsaw and sliced it into three pieces. Remember, the finished product needs to be the exact same width as the cutting edge of the iron. Fortunately the stock was significantly thicker so I had some room for error here. My main concern was making sure that the middle of the three pieces wasn't thinner than the thin part of the iron. If you are not following what I'm saying don't worry about it, you'll see soon.

I then took the middle piece of ebony, cut it to the predetermined angle, and glued it to another length of ebony which will serve as the bed of the plane. This felt like laying the keel of a boat. The picture here also shows the front section of infill being glued up with the iron bed but I actually abandoned this approach.

After the glue dried I cut the bed away and lapped the whole surface flat so that the iron sat on it nicely.
Now you can see why the infill has to be wider than the narrowest part of the iron: otherwise the iron won't fit once the sides are glued on.

Then I drilled out the mouth of the plane on the side pieces with a Forstner bit and glued them to the infill:

Then I glued the front infill in place and clamped it up:

Then I bandsawed out some areas so that the non-business end of the iron would seat properly. Coming along nicely, ain't it?

Then I examined where the rod for the wedge needed to go, drilled a pilot hole, drilled a Forstner hole, and then glued an oak dowel into place:

Next I cut a wedge to hold the iron in place and started sanding:
And sanding and sanding and sanding. The sides were well proud of the iron so a lot of stock needed to be removed. I took a fair amount down with the smoothing plane but then got nervous and went back to the paper. Let's just say a made a lot of black dust today.

Lookin' good with nice chamfered edges:

I added some Danish oil--yeah, I know...I need to get it inside the plane too. This shot shows how the iron is inserted:
It goes in sideways underneath the dowel and then you twist it flat once the cutter is in the mouth.

I call him Moby:


Some notes:
-With the iron bevel-up, the effective angle of the blade is pretty high. It still works pretty well but it might be a little better bevel-down...I'll see tomorrow.

-I also trimmed the sole of the wedge to be slightly concave. This means that the wedge exerts all it's force only on the back of the iron and on the very tip: where you want it...I'm pleased with myself for this.

-The ergonomics of the piece could probably use a little work. Expect some experimentation in the future.

Thanks for reading.