Showing posts with label Milling Wood. Show all posts

Friday, April 8, 2011

Turning Bad Wood Good...and Then Into Cabinetry

"Sarah"'s comment from the "The Crappywood Challenge" has convinced me that reader interaction is a good thing and I'd like to encourage more of it. She went into one paragraph of the blog and pulled out all of the great band names from it. I thought it was hilarious; let's see more of that.

Now back to the garage (with a detour through the bathroom).

Our guest bathroom cabinet drawers and doors stink:

The hinges are loose, the doors are warped and don't shut flat, the drawers are crooked, and the knobs are all messed up. Ordinarily I'd just slice up some plywood, paint it, and call it a day but my wife said she'd let build some rail-and-stile door for our house if I practiced frame-and-panel construction on smaller stuff--so there you go.

I wanted nice stable wood for the project, but didn't want to spend much money on it. I think wood is like steak: you can spend a lot on it and not have to work very hard for good results or you can spend less, put some effort into it, and still get good results. I bought the metaphorical cube steak:


Yep, dimensional lumber from Home Depot--good ole' southern yellow pine. Lumber from Home Depot always come with a really high moisture content and therefore moves and warps a lot when you get it home.
The above photo is from Chris Schwarz's blog. Chris has got to be the number one SYP advocate around, but even he concedes that you have to baby it.

I noticed something as I was walking around Home Depot the other day: a lot of the larger boards for sale are sectioned right through the pith (see three pictures up^^^). Now, I don't want the pith--nobody wants the pith--but on either side of the pith are prime pieces of wood, essentially quartersawn. I decided to just be selective and buy these underpriced boards and cut out the good stuff.
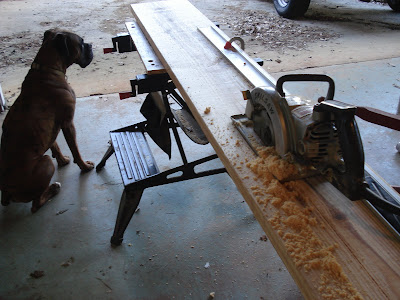
The boards were too big for me to safely handle by myself on the table saw so I busted out the old Skil 77: what a beast. Moses was, however, unimpressed: he being a bigger beast with a louder whine. You can see how wet the wood still is by how clumpy the sawdust is in the above photo. I suppose this is a good thing, as I don't really want all that stuff flying around everywhere. 

Then I just ripped the nominal 2" boards in half and had some good-sized wood for the cabinetry:
You can tell how a board is going to warp by just thinking the rings want to be straight. So now you can understand how these radial cut minimize any cupping.

Half way finished:

Construction will be pretty straightforward: a four piece frame mortise-and-tenoned together with an interior groove capturing a raised panel. No funky stick-and-cope molding nonsense...just keep it simple.

This gave me the opportunity to try out a new toy:

This is a Record #043 plough plane I just got off eBay. It's pretty versatile and a real pleasure to use. It's also probably about 70 years old and still looks great. You gotta love nickel plating: if I somehow come into possession of another one maybe I'll make it into a hood ornament. It can make a 1/4" groove half an inch deep up to 4" from the edge of a workpiece. Here it's making a narrower groove that's shallower and closer to the edge...but hey, it's my first time with the thing. This is the groove that will contain the panel. 

Here's how the mortise-and-tenon works:
I believe this is what is known as a haunched tenon. You can see how the tenon has a little nub that fills the groove to the right of the mortise. This is a good little trick that makes a stronger and cleaner joint.

Come together:

Right now:

Over me:
In the last picture I'm actually only gluing up half of it. One of the stiles (long pieces) can be popped off so I can slide the panel in when it's ready.

Speaking of the panels, it's time for those. My plan is to tongue-and-groove three boards together and then just be able to saw off sections to length as needed for the panels.

Tongue-and-groove, mortise-and-tenon, stick-and-cope, rail-and-stile, frame-and-panel...sheesh.

Anyone need any fire starter?

So that's where we stand now...waiting for some glue to dry. Tomorrow I'll make the raised-and-fielded (there's another one!) panel for this prototype door. Later.

Sunday, November 7, 2010

Miller Time!

It has finally started to get cold here in Atlanta and at our house that means it's time for fires. At one point I had a firewood collection that I thought would last us through 2013 at least. That does not appear to be the case. At this point I'm not sure it will last us through this winter. With this weighing on my mind I went out to split some wood yesterday. I'm a bit of a neighborhood scavenger: whenever I'm out walking the dogs and see that someone has felled a hardwood and left the logs for the county to pick up I'm instantly on them.

This summer some yellow jackets took up residence in my splitting area which prevented me from getting at a couple of nice truck pieces during the warm seasons--I'm rather allergic to stings. Besides who wants to split wood when it's hot out? The yellow jackets have now left (or are hibernating, or have died...whatever they do during the winter) so the splitting can commence.

This trunk log had been sitting on the ground for at least 6 months, so I wasn't surprised that there was some spalting. What did surprise me was how much there was. Hmmm, warm the house or have some interesting wood to work? There will always be firewood out there...I decided to slice it up. 

Here's what I started with:
It's big and chucky and won't really fit on my bandsaw.

By slicing off some of the more extreme areas I can make it fit into the mouth of the saw.. Take care in doing this, it's a good way to break a blade.

If you are going to all of the trouble to mill your own wood, you might as well quarter-saw it, right? My first cut on the sled is a cut parallel to the tangent of the arc of the outside of the tree (arc of the bark, if you will). This will serve as the base of the log and all cuts afterwards will be normal to this. Here's the resulting first cut:

Pretty dramatic, isn't it? The picture is a little misleading because it looks like this cut is radiating out from the middle of the tree. It isn't...that log just split funny. My sled is a copy of Matthias Wandel's...I wish I had a bandsaw as big as his.

Then I planed the surface with my jointer to flatten it:

Next I put the log flat face down on the sled and ran it through again:

Now I had two faces normal to each other. At this point I just set the fence on the bandsaw and sliced away:

Of note: this was a funky piece of wood with wavy grain:

Wood like this is much easier to plane when it is still moist.

Now I'll just let it sit in the shop for a while and dry out. I'm not sure what to do with it just yet but it never hurts to have some decorative wood on hand. I wonder how much Carlton's pays for stuff like this.

Monday, September 13, 2010

The Half-Deft Creating the Half-Blind

The below drawers represent the latest thing out of the garage. 
Sides

Fronts

Innards

These had a couple of firsts-for-me incorporated. Perhaps the defining characteristic of the drawers is the half-blind dovetailing going on between the fronts and the sides. I've been through-dovetailing for a couple of years now and was getting pretty comfortable with it. I figured the half-blind would be a little more difficult and take a little more precision than my skills allowed; so for years I never tried one. I think a primer on The Wood Whisperer a little while back made me think hmm...I'm not sure what I'm so afraid of.

So I took a little scrap wood and knocked some out. I'll say this...they take a tiny bit more time, no more skill, and are much more forgiving that the through version. In the end, only one side of the guts are exposed, therefore you can be pretty sloppy with the rest of it. I was also blown away by the strength of the joint too.

I used this project to experiment with different tail configurations. I think I dig the regularity and proportions of the middle two.

The backs are doweled (quick and easy) and the bottoms are just butt-joined and inserted into dados cut with my slot-cutter on a router table (quick and easy). Here's another joy of the half-blind: as long as the end of your dado is fully contained by the tail, it won't show in the finished product...more quick and easy.

The first photo shows how the top three drawers have fronts that extend below the bottom of the sides. My intent is to create hardwood rails equal to the height of this overhang upon which the drawers will ride. These rails will also guide the below drawer. Essentially each drawer will be braced in place and only allowed to move along one axis. It will also allow all drawers to abut each other and be right up against the sides, bottom, and top of the carcass...nice and clean.

Here's something a little off-topic: notice how the picture of the cover has the subtitle as "Design and Make by Hand and Machine" but the subtitle listed (and the one I'm familiar with) is "Handmade Furniture's Signature Joint." To me, these suggest very different approaches. I think Mr. Kirby should just go with "Woodworking's Signature Joint." I know the dovetail is used in other applications but I'm sure workers of wood embrace it like none other.

The other first-in-my-experience is that--minus the dowels--all the wood used was from my firewood pile. I finally got my bandsaw up and running with a resaw blade and went to work. I used Matthias Wandel's bandsaw sled idea and it ain't pretty, but it sure works. I cut a flat face and then another one 90 deg. to the first.  I then abandon the sled and just use my homemade fence to slice off boards.

I suppose this is as good a time as any to sing the praises of Matthias. Anyone who has looked through a woodworking catalog and said, "I could build that myself," needs to check his site out: the man built his own massive bandsaw, for goodness sake. His website and the Lee Valley catalog have convinced me that maybe we should reconsider our opinion of the Canadians.

Back to the wood, here's the thing: I have no idea what it is. It's spalted pretty nicely and being able to quarter-saw it brought out some niceties.

I'm exhausted...that's all for now.

Here's one for the road that's worth listening to all the way through: