Wednesday, September 29, 2010

The Vise Squad in Action!


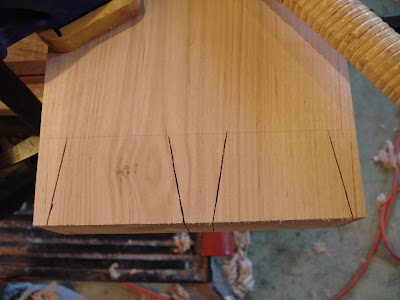
When last I left off, I had dry-fit the skirt. Before I glued it up I wanted to trim it to shape and get the vise holes drilled. These are processes that are much easier when you can deal with small individual pieces. If you remember, on the face vise end (the left side) the skirt terminated at a big blank right angle. That didn't suit me much. Here's the finished shape mocked-up:
Elegant curve, ain't it?
The final thickness of the taper is equal to the thickness of the benchtop. I think that the transition is going to look really good. (See the previous post for an idea of what I'm talking about.) This picture also gives a sneak peek at my next topic: vises.

The two vises I'm using require drilling big deep holes. This is actually a little trickier than you might think. I have a drill press but it is sort of pathetic and starts to smoke when I put big loads on it, so I try to keep the torque requirements low. For this reason, I have a special procedure for going big. I start off by taking my final diameter drill bit--in this case and most others, a Forstner--and create a shallow hole:
This shallow hole will provide a reference later on. I then take the wood off the drill press and select a spade bit one size below the Forstner. With a cordless drill I then hog out the majority of the hole:
You can be a little sloppy with the spade bit because it is smaller than your Forstner and the hole doesn't have to be straight. I then take the board back to the drill press, center the Forstner bit in the previously drilled hole and ream out the finished hole. This may seem tedious but those who have experienced the speed difference between a spade bit and a large Forstner will appreciate that this is actually faster than going straight through with the Forstner alone.

So that's that.

Once the drilling was done it was time for glue-up. I'll cut right to the chase: I screwed this up. I first glued the floating tongue into the benchtop, let it dry, and then glued the skirt onto it. Apparently I didn't force the tongue all the way into the benchtop because when I tried to force the skirt onto it, it would go all the way. Not too big a deal, right? I could just trim the projecting tongue down a little and the skirt should fit right on. Unfortunately I only discovered the problem after a one part of the skirt had been set in place and, to make a long story short, I had no options. Here is the result:

You can see that there is an unsightly gap between the benchtop and the skirt. It's too big for the old sawdust-and-glue trick so I'm forced to consider other options. Here's my plan: I'm going to rout a groove around the whole benchtop/skirt transition and infill it with a contrasting dark wood inlay. Nothing like turning a screw-up into an artistic enhancement. I think it will look really sharp...ebony maybe?

I also couldn't resist doing some vise mock-ups before I called it an evening. I had a massive chunk of maple that I reserved for the tail vise jaw but didn't have anything in mind for the face vise. Then I saw this guy on the floor:
It was a cut-off from the sycamore and it pretty soft wood. Now this:
Or this:
I'm leaning toward the second configuration because I typically keep my work on the right side of the vise so that's where I want the meat. The asymmetry is pretty unconventional, but then again so is the whole bench. Expect a little embellishment on this jaw in the future...

So here's where I am now:

To do list:
Attach third skirt section with the other part of the benchtop
Attach tool tray
Assemble remaining vise hardware (right now they are just hanging there)
Get cracking on the legs (huge task)
Decoration, detailing, etc.
Surface treatment and epoxying
Possibly install those drawers I made earlier...I'm not sure about this...we'll see.

I'm tired, exam in exactly 12 hours and 10 minutes.

To be continued...

Sunday, September 26, 2010

Bringing it Together

Today I knocked out the other required ostrich tail and routed the corresponding groove in the skirt. At this point it was time to try a dry-fit to see if the "floating tongue" idea would work. Here's a picture that may give you a better idea of what's going on here:
I actually routed the skirt groove maybe 1/32th of an inch lower than the benchtop groove. This will leave the skirt a tiny bit higher which I will later plane flush. I did this because there are always going to be little variations in alignment and it will be easier to trim the skirt down than to bring the whole benchtop down.

I'm pleased to say that it appears that the floating tongue concept does work pretty well; the skirt did force the benchtop to be much flatter. However, it did require a lot of force to wrangle it into shape. After all, these are some thick pieces. Here's an "in progress."

Originally I tried to do it all at once. This wasn't going to happen: the non-alignment of the skirt and benchtop prevented everything from coming together. I found what worked was starting at one end, using clamps to bring that little section together, and then leap-frogging the pipe clamps down the length of the bench. This worked like a charm. Finally I had this:
Now things are coming together. I'm not sure what I'm going to do about those plain-jane squared-off skirt ends there. I guess the next step is to take it all apart, figure out those ends, drill the holes in the skirt for the vises, then glue it all together again.

One for the Andy Rooney Crowd...

Did you ever notice how...just kidding.

I'm making a concerted effort to keep this blog on topic and not let it devolve into my personal soapbox. This post is, however, only marginally connected to woodworking. So there you go...you've been warned.

The woodworking connection is that I won a #5 1/2 jack plane off eBay two weeks ago and it still hasn't arrived. Yes, the seller took about three days to ship it but that's not unheard of. The real issue here is the US Postal Service. Check out the tracking info:
[Insert joke about government operations here]

Before I moved to Atlanta I would've said that Memphis and Atlanta are pretty close. After all, Georgia and Tennessee share a border. I can assure you that they are not close. I've made the drive and it is a quite a haul. 

I understand that mistakes happen occasionally, but I emailed the seller about this and she said that it happens all the time! Is it any wonder that businesses who depend on high customer satisfaction use FedEx and UPS?

Here's something to ponder: USPS's financials are already abysmal; imagine what they would be like if there was no junk mail. I may be ready to see this dinosaur put out of its misery.

Okay, no more whining for at least two weeks.

Jumbo Joinery: Half-blind Ostrich Tails?

The focus these days is less on the benchtop--thank goodness, it's getting old--and more on the interesting components. My original thinking on the skirt was to use 3" wide 4/4 maple to wrap the top. I've since decided to go with 6.5" wide 8/4 maple instead. The reason for this shift to the massive lumber is that I've decided on employing a method whereby the skirt helps to flatten the top. Let me try to explain...

The above photo shows the benchtop upside down and if you look closer you can see that I have routed a slot around its perimeter. That slot is a uniform distance from the top of the benchtop all the way around. The skirt components will have a corresponding slot routed the same distance from their respective tops all along their insides. I plan on cutting what I call "floating tongues" that will be inserted into the matching slots where the super-rigid, super-straight skirt pieces will pull any deviations in the benchtop into alignment. If this doesn't make sense, hopefully the pictures I take when I attempt it will do a better job. I'm looking forward to seeing if this will work. 

Now on to the skirt. Skirts aren't necessary on benches and in fact some people prefer not to have them because it makes it easy to clamp anything anywhere to the benchtop. This skirt will be so thick that I don't think that will be a problem. I got another one of those massive 8/4 beams from Carlton's the other day. Carlton's is over by Georgia Tech but it isn't often that I have a car over there. I had a job interview on that side of town on Thursday so I drove my car to school, went by the wood store to pickup the beast and then went to the interview. I wonder how many people show up for a job interview with 14' 2"x7" strapped to their roof rack. Not enough is my answer. 

I planed, jointed, ripped, and crosscut to spec and then approached the joinery. As I've written about previously I'm a fan of the half-blind dovetail these days. I think it makes sense here because the skirt will also be the inner jaws of the two vises. The half-blind allows me to keep that inner jaw area as purely face-grain instead of a face-grain/end-grain combo. So I whipped out my new marking gauge and got to it. Expect a forthcoming post on this style gauge versus my previous one.

First cut:
Not great, a little ragged, at least it's square.

Finished my tail cuts:
 Two good ones, two mediocre ones.

Then I cut the shoulders for the tails:
(Notice trashcan o' shaving No. 2 in background. Yep, just about full)
A couple comments: This will probably be my last project using Japanese saws so I thought that the dozuki should get a glamor shot. It's been a good saw that has served me well and I'll explain my transition to Western saws in a future post. Also, I'm really looking forward to having proper traditional woodworking vises on this new bench but this situation demonstrates how handy it is to always have a little vise floating around that you can clamp anywhere. This Groz was one of the first woodworking purchases I ever made. 

Chopping the waste:
I've never done dovetails this big before. Typically when you are chopping the waste from between the tails you can just use a coping saw for the majority and then pop the bottom of it out with a couple of hard, well-aimed chisel blows to either side. Not the case here: I approached this as I would the sockets of the pin board. I clearly establish the bottom of the waste with a big chisel and then take aggressive paring cuts into the grain. This removes the waste in a pretty controlled manor. 

Halfway through:
Time to flip it over and work from the other side. 

All finished.
 I didn't screw anything up too badly. Phwew!

Then I align the tails on the pin board and transfer the tail profiles with a marking knife
You can see my marking knife in the top left corner. It is beveled on one side only which is pretty dumb: subject for a future post? Maybe. 

Alright, now for the tedious part: wasting the sockets for the pins.
After some nervous moments on the first one, I tried a new approach for the second one. I drilled relief holes down into the sockets ala "burn holes" from the tunnel blasting industry. Previously when I would pry that waste out of the tapering socket, it risked damaging the pins by scraping and compressing them on the way out. The relief holes A) divide the waste into smaller pieces and B) give the waste substantial lateral leeway so it doesn't damage the pin walls on the way out. A real dovetail chisel would also be nice for getting into those deep corners. *sigh* Lie-Nielsen, why you gotta be so expensive? Oh, that's right...actually made in America.

Tap it in...
I hope nothing splits! 

Complete:

I'm going to take a second to brag here. This fit "right off the saw." In other words, no trimming and adjusting was needed. A lot of people are taught to cut almost to the line and then use chisels to trim it to fit. I like Konrad Sauer's philosophy. Essentially he says that if you practice cutting almost to the line, you are never going to get to the point where you can fit pieces right off the saw. And that's the goal, isn't it? You need to practice cutting to the line from the very get-go. This is the only way to get really good. Now I'm not saying I'm really good, but this joint is not too shabby (that gash in the left-most pin was the result of slopping chisel-work...not sawing.) 

In retrospect, that would've been a good name for this blog: "Right Off the Saw." On the other hand, the acronym ROTS isn't so great for a woodworking blog now is it?

Personal Stuff:
They say that there is nothing more exhilarating than being shot at and missed. I'd say that a close second to that is having serious car trouble and then finding out that the problem is covered by a manufacturer's recall. I've never felt so alive!!!

Also, if you are enjoying these posts may I suggest that you become a Follower by clicking the button at the top of the page? Does that make me a Leader? I wish I had something special to give my followers...I'll tell you what: the first follower to come by my house can have a full trashcan's worth of saw dust and wood shavings. It's great for fire-starter, rabbit hutches, mulch, chemical absorbent, prank itchy powder...you name it, it does it. But no, you can't have the trashcan. 

Wednesday, September 22, 2010

Wish I Could Think of a Witty Title...

I was struggling to bring together a pun involving the fact that the package that arrived today contained a massive #7 Stanley plane and that Boeing 7*7 series airliners are massive planes. Anyone have any suggestions?

Well, I'll get right down to it. I did a rough tune-up on the plane to get it in working order and am happy to say it seems to be properly functioning now. Here's the glamor shot:
For those not in the know, the #7 is a jointer plane made for flattening surfaces. The length of the sole provides a large reference surface off of which the iron tracks.

If you want to find some real nut-cases out there, search around the internet for vintage plane enthusiasts. In the parlance of that particular group, this specimen is what is known as a "user." In other words, it's in decent shape but not exactly pretty. That's fine with me; I can't afford to buy stuff for show. It certainly is manly, isn't it?

This picture showing how the plane iron and chipbreaker came reminds me of an anecdote:
Note how the bevel--if you could call it that--is oriented up, towards the chipbreaker
I forget the context of the story, but a man is visiting California for the first time and has been just dying to try out surfing for the first time. On the last day of his trip he runs out to a surf shop, buys a wetsuit and board, throws them in his car and drives down the beach. To his dismay he see signs up informing him that there are rough conditions present and only advanced surfers should be out there. I'm not going to let that stop me he thinks, I've come too far and spent all this money and there is no way I'm not going to try surfing. So he gets suited up and is carrying his board across the beach when suddenly, from 200 yards down the beach, the lifeguard blows his whistle, points directly at the man and yells, "Hey! You! No beginners!" The man walks over to the lifeguard and asks, "How in the world did you know that I was a beginner?...I didn't even get in the water." The lifeguard: "Your wetsuit is on backwards."

There are just certain things that so glaringly obvious to those in the know that they can be seen from 200 yards away. 

Bench planes have the iron bevel-down (yes yes, I know there are exceptions.) No wonder the seller was ready to get rid of it, it probably didn't work so hot this way. Anyway, I noticed this before I even got it out of the bubble wrap.

Other issues:
The knob is chipped. No big deal.

The tote is chipped and cracked...

...but the crack is repaired now. I can live with it.

This is about 10 seconds worth of lapping the sole. Yeah...there was a little oxidation. My mouth still tastes like pennies; I should probably pick up some dust masks from work on Friday. All told I spent about 30 minutes and maybe seven yards of PSA-backed sandpaper flattening the sole and sides. 

The blade also needed a fair amount of work but it's shaving-sharp now and the whole rigs works really well.

In other news, I routed the rabbets on the underside of the tabletop today. These will provide a reference for the tool tray. Here's a picture of the underside of the assembly:
For the record, I have experienced no diminishing returns in owning two Workmates. In fact, I would say that owning two is more than twice as useful as owning one. Three is probably overkill, although there have been times...

I think that will do it for today. Scary stuff starts happening tomorrow when I start the process of pulling it all together. Mistakes will be made, of that I am sure.

Monday, September 20, 2010

Hat Status: Officially Over the Fence

I made some cuts yesterday...

There's quite a check in this end. Yikes! This may require some remediatory action.

This end is pretty good. It's got a bit of a knot near the end which means super-tough wood. This might be a good place for chopping dovetails.

Here's the section that will be on the far side of the table. I've got a couple of ideas for this piece that will add some complexity but should also make the whole project really distinctive.

Here are two cringe-inducing pictures:
As you can see, there is still a lot of flattening to be done. Hopefully that #7 will come in today. You'll notice that opposite corners are up which means that this guy is twisted, rather than just cupped/crowned. Grrrr, are we having fun yet? I see lots more planing in my future:

(This is actually trashcan o' shavings #2; a full bag went down to the curb this morning.)

Here's a partial solution for that nasty check on the one end:
I've got a massive end vice that would easily span the two sections and stabilize them pretty well. For a couple of reasons I had pictured this end having the face vice (opposite the end vice) but the situation may warrant a change. I'm also planning on epoxying the void to stabilize it; I'm thinking un-dyed amber West System would do it. I wish they sold it in smaller quantities...any donors out there?


Sunday, September 19, 2010

New Adventure Sighted on the Horizon!

There is a fairly significant amount of tree on my garage floor right now:


She's a beaut, ain't she? I just got back from Carlton's with a roof rack loaded with these pieces. I've been thinking about building a new workbench for some time now and was finally able to pull the trigger. The left-most piece is 8/4 maple for the legs and stretchers. The middle two pieces are 4/4 maple for the apron and tool tray. The right piece is a big old slab of sycamore felled 10 years ago in Blue Ridge, Ga. It's a little over 2" thick, pretty punky, rather irregular, and not exactly what one would call flat. In other words, the top of this bench might be a bit of a challenge.

Here's the cut plan:


The far end and the right side (with the "arm" sticking out") will be scrapped and used for odds and ends. The middle section will be the primary tabletop and then there will be a tool tray between the middle and left side sections. I'm going to leave the waney edge on the left side because A) this will be the back side of the bench so it doesn't really need to be straight, and B) who doesn't love a little bark on a functional piece? I know I certainly do.

Here we have an "in progress" shot of the top. 

I'm working with my #4 smooting plane here, because that's the best I have for the job right now. I just won a jack plane (#5 1/2 Stanley) and a jointer plane (#7 Stanley) on eBay and hopefully they will be arriving soon. They will also provide a good opportunity for a post on how I tune up planes. If the above photo was a video with sound you'd hear the #4 muttering "I ain't made for this $#!T," which is certainly true.

More shots:


Those last two pics really highlight the spalting that's going on with this sycamore. The wood is definitely softer in those areas but Richard at Carlton's showed me a product that he claims will actually harden the wood...we shall see. It's Minwax Wood Hardener and it's marketed to people who would prefer to salvage their rotten porch steps than replace them. That's noble, I suppose. Richard showed me a sample of wood he had hardened and while I didn't test it's hardness, I will say that I was satisfied with its appearance. It slightly darkened the wood, but it still looked pretty good. I think I'll try the stuff out once everything starts coming together.


Ryan Adams influence?:

Monday, September 13, 2010

The Half-Deft Creating the Half-Blind

The below drawers represent the latest thing out of the garage. 
Sides

Fronts

Innards

These had a couple of firsts-for-me incorporated. Perhaps the defining characteristic of the drawers is the half-blind dovetailing going on between the fronts and the sides. I've been through-dovetailing for a couple of years now and was getting pretty comfortable with it. I figured the half-blind would be a little more difficult and take a little more precision than my skills allowed; so for years I never tried one. I think a primer on The Wood Whisperer a little while back made me think hmm...I'm not sure what I'm so afraid of.

So I took a little scrap wood and knocked some out. I'll say this...they take a tiny bit more time, no more skill, and are much more forgiving that the through version. In the end, only one side of the guts are exposed, therefore you can be pretty sloppy with the rest of it. I was also blown away by the strength of the joint too.

I used this project to experiment with different tail configurations. I think I dig the regularity and proportions of the middle two.

The backs are doweled (quick and easy) and the bottoms are just butt-joined and inserted into dados cut with my slot-cutter on a router table (quick and easy). Here's another joy of the half-blind: as long as the end of your dado is fully contained by the tail, it won't show in the finished product...more quick and easy.

The first photo shows how the top three drawers have fronts that extend below the bottom of the sides. My intent is to create hardwood rails equal to the height of this overhang upon which the drawers will ride. These rails will also guide the below drawer. Essentially each drawer will be braced in place and only allowed to move along one axis. It will also allow all drawers to abut each other and be right up against the sides, bottom, and top of the carcass...nice and clean.

Here's something a little off-topic: notice how the picture of the cover has the subtitle as "Design and Make by Hand and Machine" but the subtitle listed (and the one I'm familiar with) is "Handmade Furniture's Signature Joint." To me, these suggest very different approaches. I think Mr. Kirby should just go with "Woodworking's Signature Joint." I know the dovetail is used in other applications but I'm sure workers of wood embrace it like none other.

The other first-in-my-experience is that--minus the dowels--all the wood used was from my firewood pile. I finally got my bandsaw up and running with a resaw blade and went to work. I used Matthias Wandel's bandsaw sled idea and it ain't pretty, but it sure works. I cut a flat face and then another one 90 deg. to the first.  I then abandon the sled and just use my homemade fence to slice off boards.

I suppose this is as good a time as any to sing the praises of Matthias. Anyone who has looked through a woodworking catalog and said, "I could build that myself," needs to check his site out: the man built his own massive bandsaw, for goodness sake. His website and the Lee Valley catalog have convinced me that maybe we should reconsider our opinion of the Canadians.

Back to the wood, here's the thing: I have no idea what it is. It's spalted pretty nicely and being able to quarter-saw it brought out some niceties.

I'm exhausted...that's all for now.

Here's one for the road that's worth listening to all the way through:

Thursday, September 9, 2010

John: Chapter 1, Verse 1 In the beginning...

Today is the first post on what I hope will be an interesting project. This blog will detail the goings-on in my workshop garage with a focus primarily on woodworking projects. I've been working wood for about three years now and am starting to feel like I am turning a corner from pathetic novice to slightly-less-pathetic novice. I will try to bring to the table different topics that I encounter along the way and eventually hope to receive feedback later on.

Background:

Age: 27
Location: Tucker, Ga
Occupation: Grad Student at Ga Tech.
Song stuck in my head right now: